 困っている人
メタマスクでBSCやAvalancheを使いたい!
パソコンだけでなくスマホ版もあわせて、メタマスク(MetaMask)にネットワークを追加する方法を教えて欲しい!
そんな悩みや疑問を解決します。
- 最新版:4タップでMetaMask(メタマスク)にネットワークを追加する方法
- スマホ版:メタマスクにネットワークを追加する方法
- パソコン版:メタマスクにネットワークを追加する方法
- メタマスクでネットワークを切り替える方法
- ネットワーク追加後にやるべきこと
メタマスクはデフォルトだとイーサリアムしか使えないため、自分で新しいネットワークを追加する必要があります。
この記事を読めば、メタマスクにネットワークを追加して、NFTゲームやDeFiで遊べるようになりますよ!
管理者プロフィール
 はやたす
はやたす以下の実績や経験を持つ僕が記事の執筆・監修をしています!
- 暗号資産取引所Zaifでメディア出演(詳しくはこちら)
- 東証1部上場の金融企業で勤務経験
- 身銭を切ってDeFiやNFTゲームをリサーチ
なおメタマスクを使うために国内取引所から仮想通貨を送金するなら、購入手数料が安いbitbank(ビットバンク)がおすすめです。
コインチェックで送金用のリップルを100万円分買うと、ざっくり40,000円の損になります。

一方でbitbank(ビットバンク)であれば、手数料を支払うのではなくキャッシュバックを受けられます。
無駄な手数料を支払って損するくらいなら、そのお金でビットコインを買った方が良いですよね。
3分もあれば口座開設できるので、今のうちに登録しておきましょう!
\ 最短3分&取引手数料が安い /
【最新版】4タップでMetaMask(メタマスク)にネットワークを追加する方法
メタマスクのネットワーク追加は、たった4ステップで完結するようになりました!
はやたすこれからネットワークを追加する人は、まず以下で紹介する手順を参考にしてみてください!
まずはメタマスクを開いて、画面上部から「Add a network」をタップ。

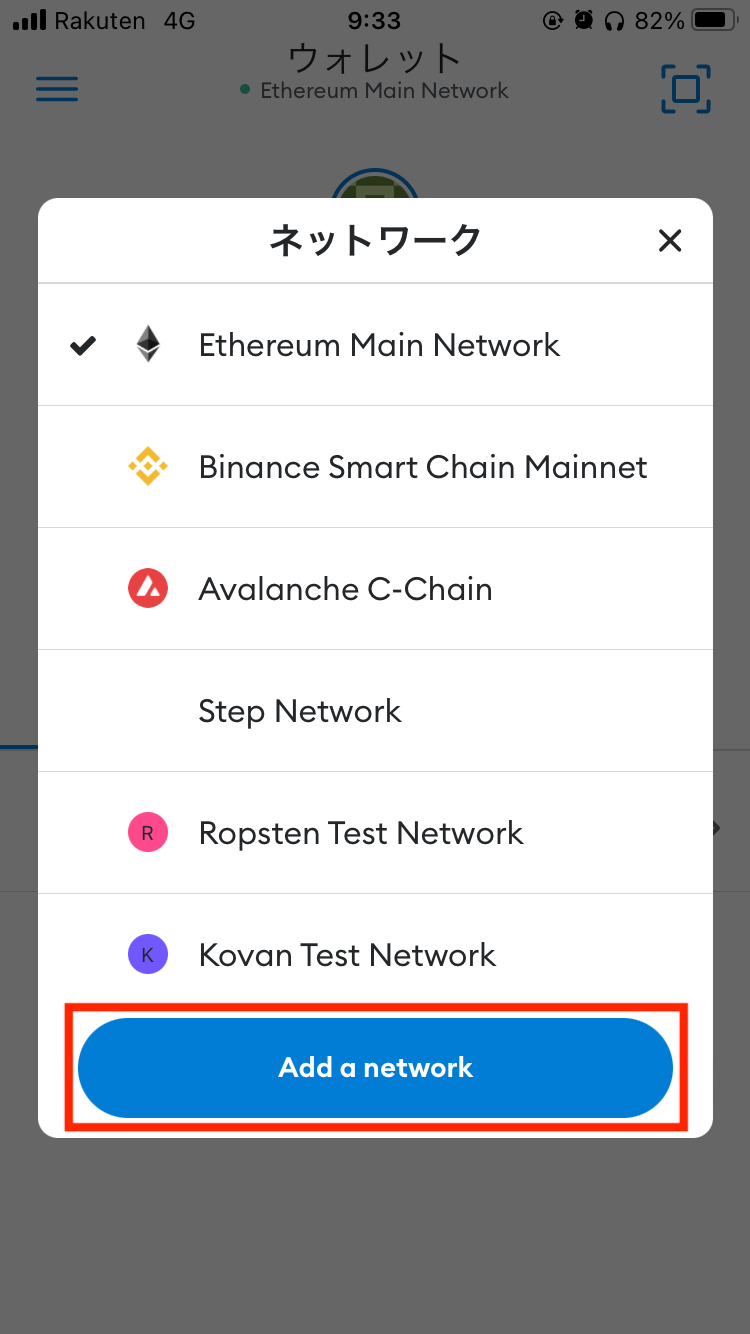
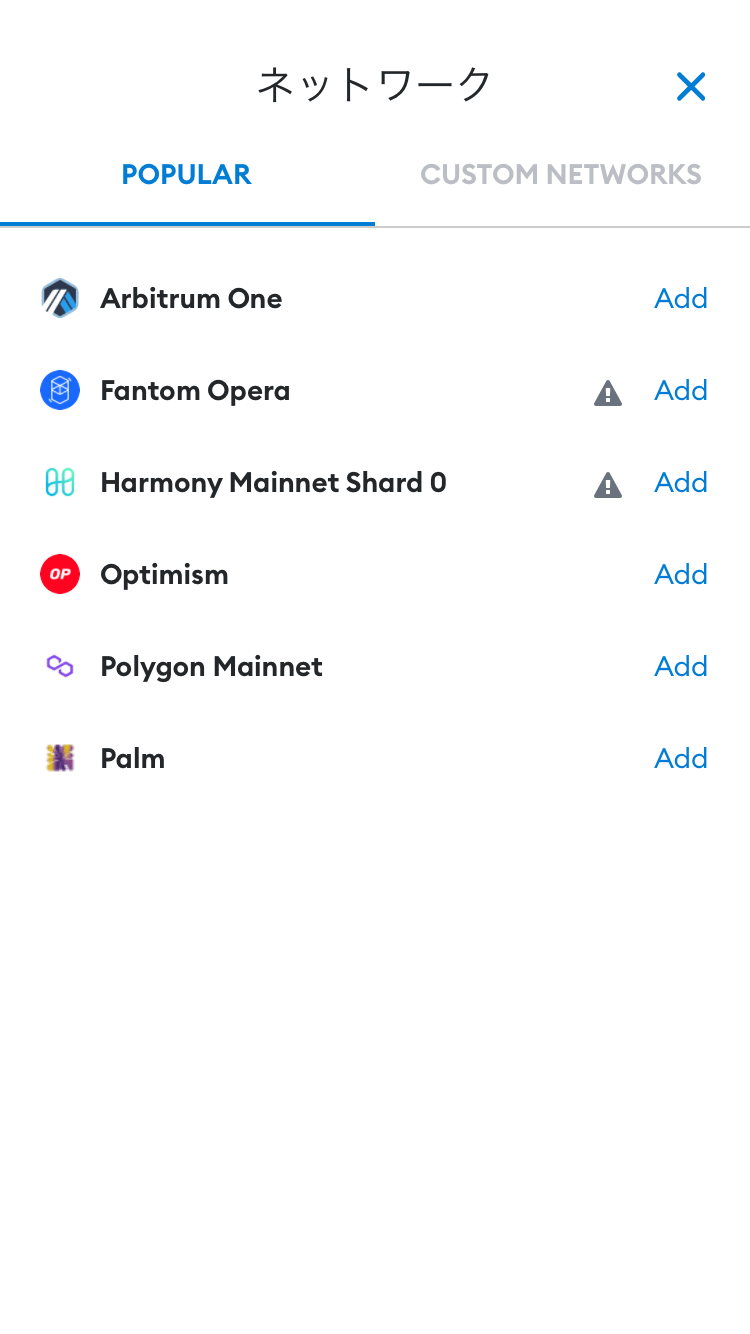
ここで人気のネットワークが表示されます。
自分が追加したいネットワークで「Add」をタップしましょう。
Arbitrum(Arbitrum One)を追加するなら、次の画面で「Approve」を選択します。
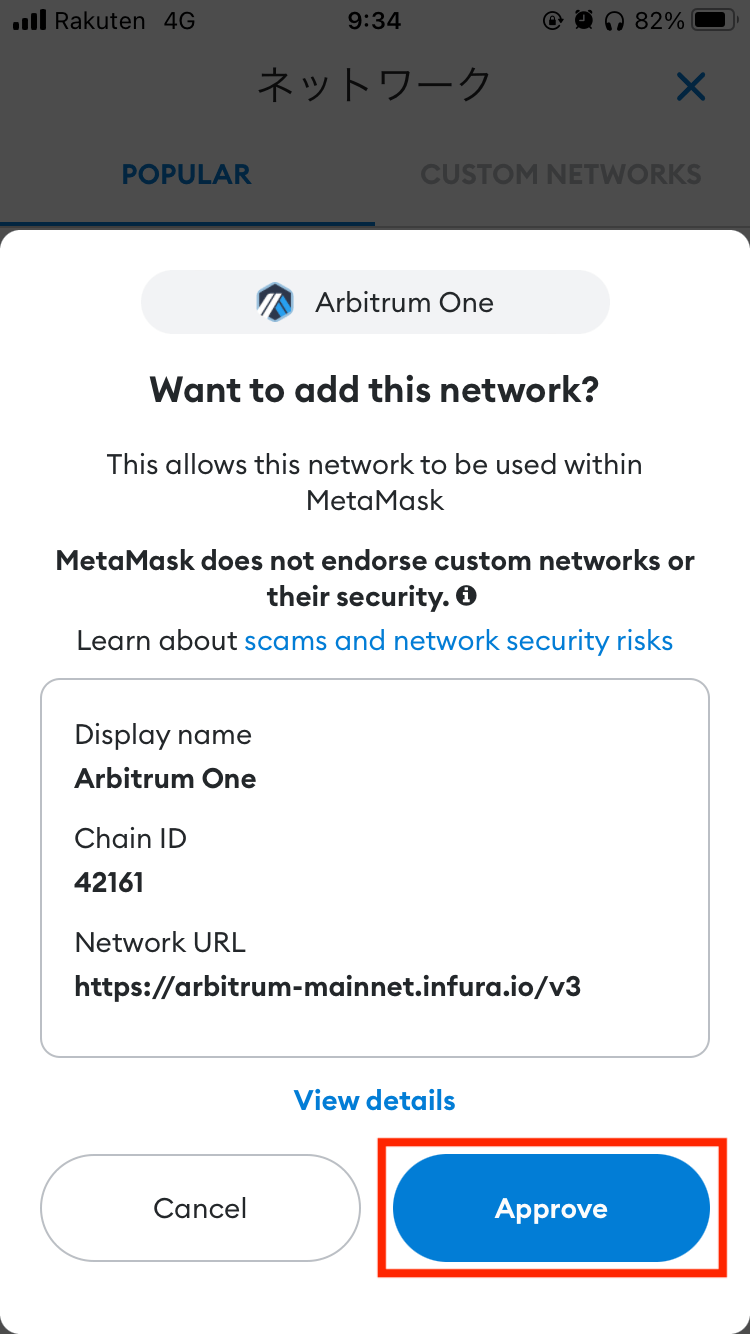
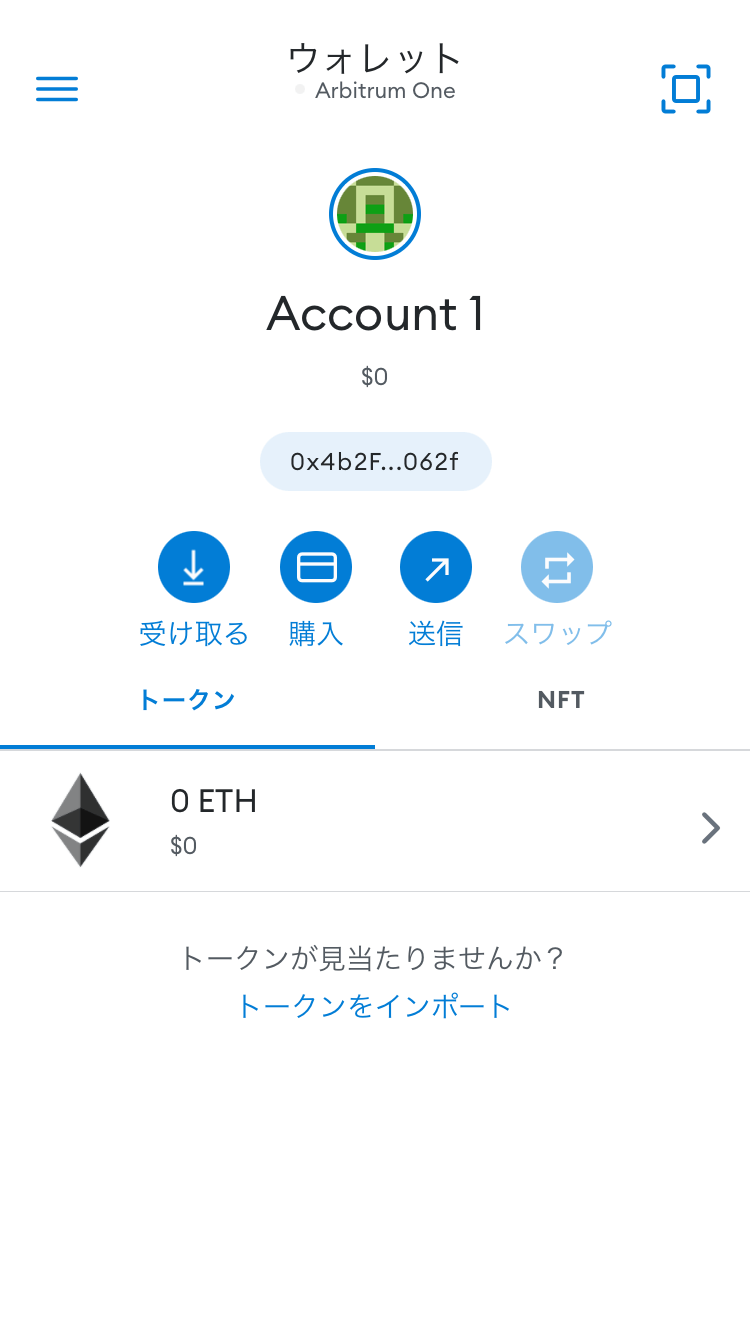
これでネットワークを追加できました!
そのままArbitrumに切り替えるなら、「Switch to network」をタップ。
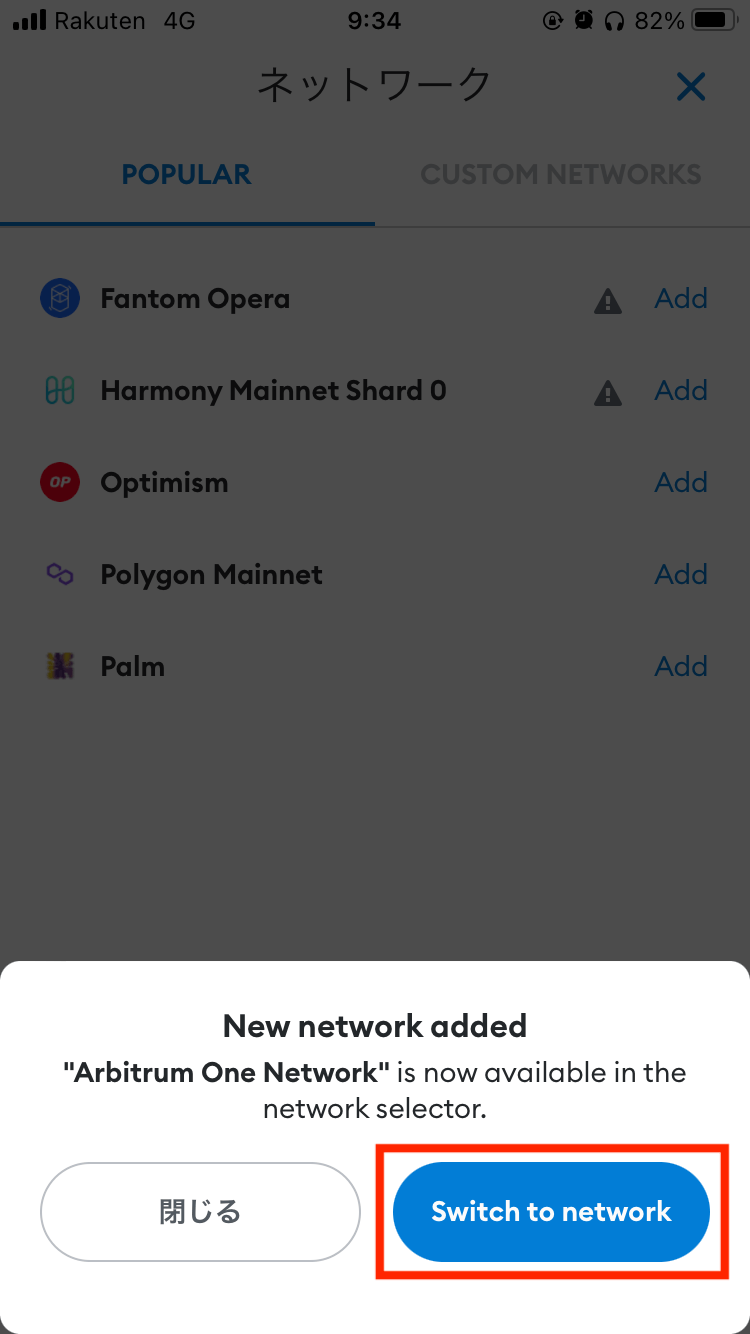
たったこれだけで、ネットワークを追加できます。
ほとんどのメジャーなネットワークに対応しているので、まずは上記の方法を試してみてください。
【スマホ版】MetaMask(メタマスク)にネットワークを追加する方法
メタマスクで表示されていないネットワークを追加するには、Chainlist(チェーンリスト)を使います。
先にスマホ版のメタマスクで、以下のネットワークを追加する方法を紹介しますね!
- BSC(バイナンススマートチェーン)
- Avalanche(アバランチ)
- Polygon(ポリゴン)
上記以外のネットワークを追加したいときは、Chainlist(チェーンリスト)で検索するキーワードを変更してください!
※パソコンでメタマスクを使っている人は、以下のリンクからスマホ版の解説をスキップできます。
準備:Chainlist(チェーンリスト)に接続する
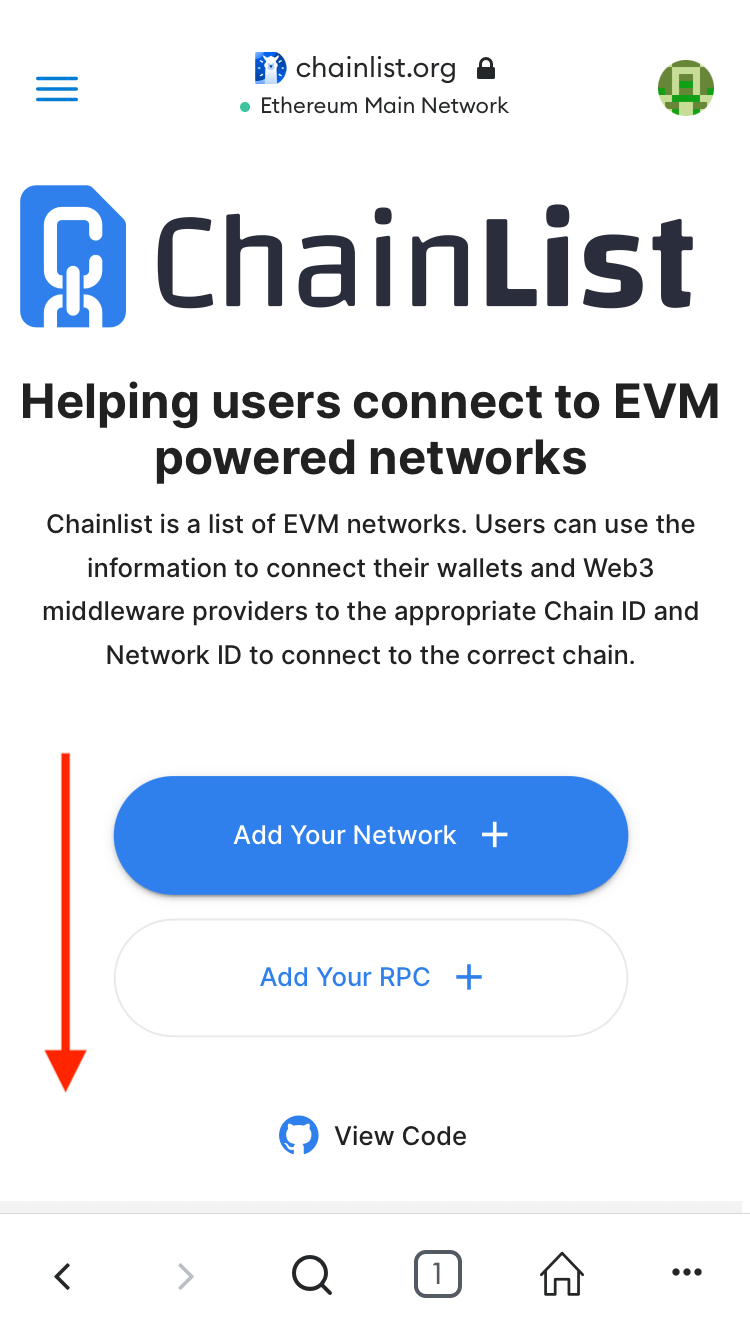
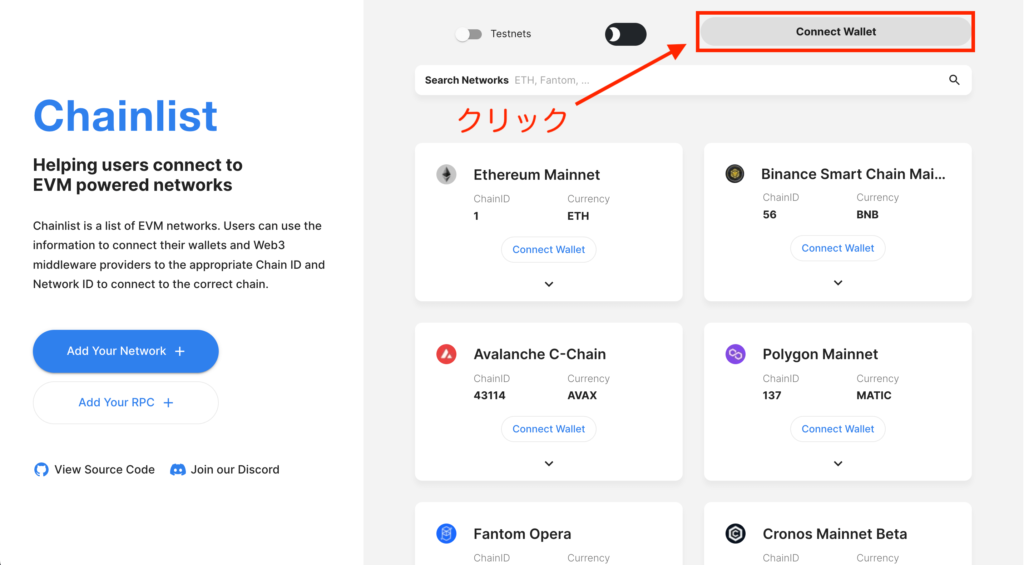
まずはChainlist(チェーンリスト)でメタマスクを接続します。
Chainlist(チェーンリスト)は簡単にチェーン(ネットワーク)を追加できるサイトです。
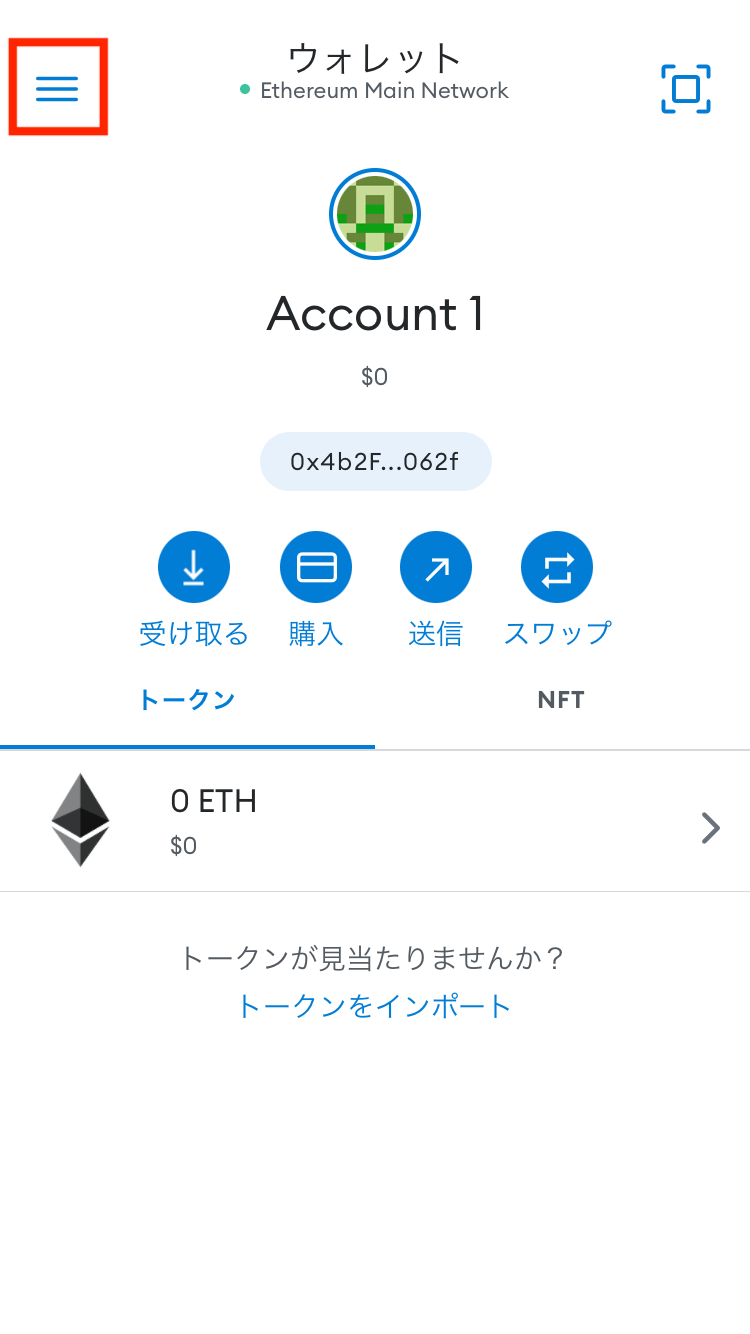
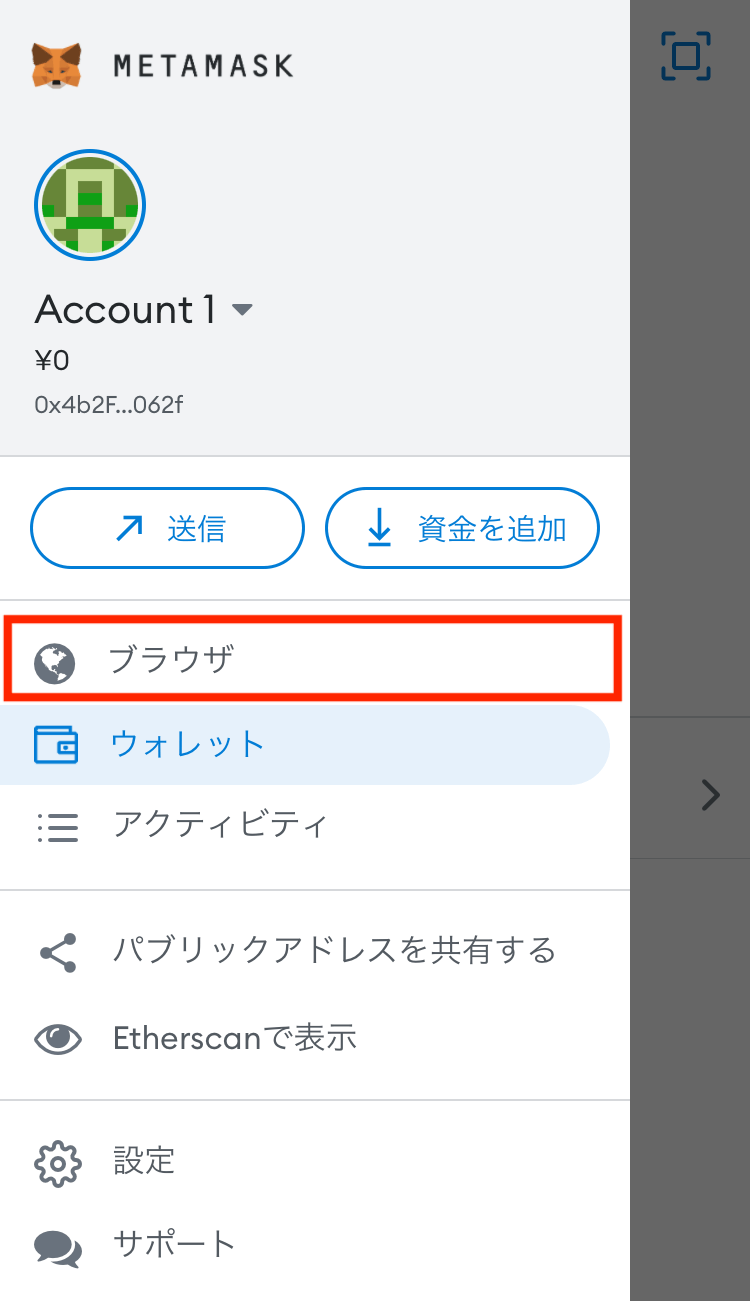
メタマスクを開いたら、画面左上にある三本線から「ブラウザ」を開いてください。
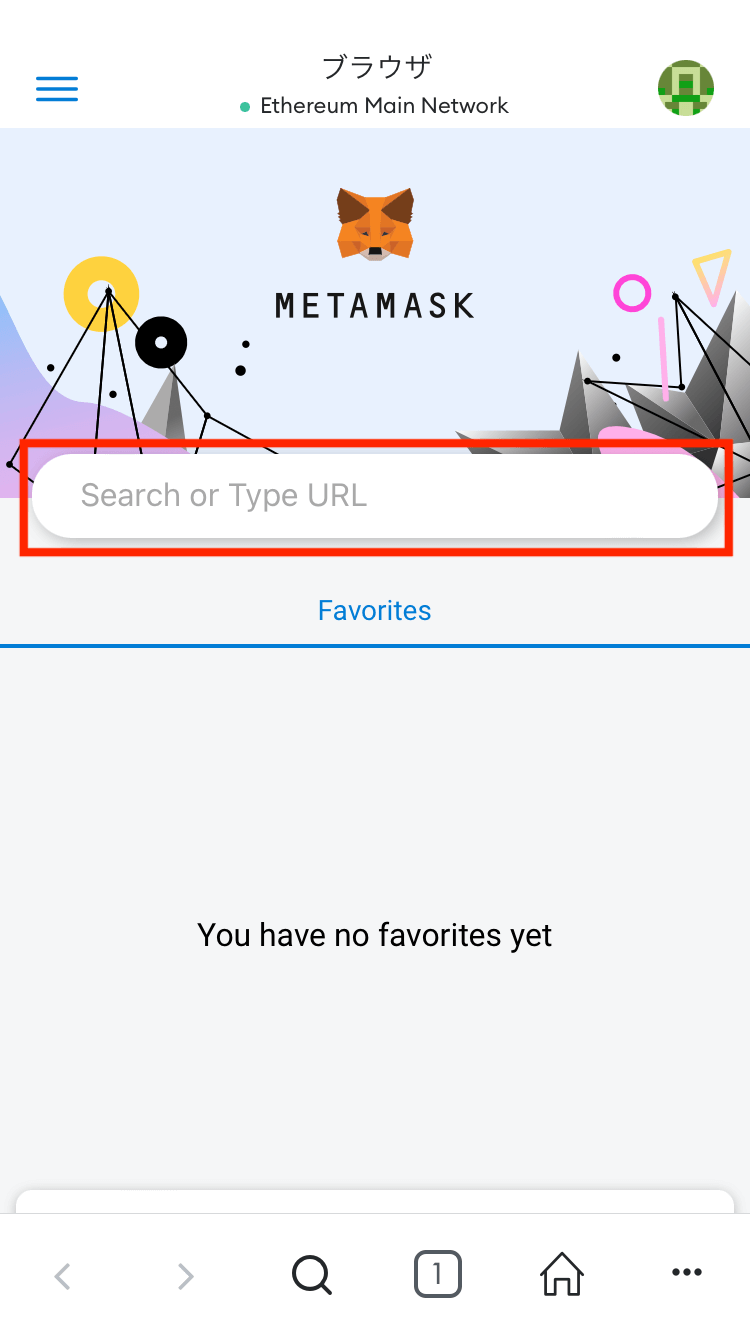
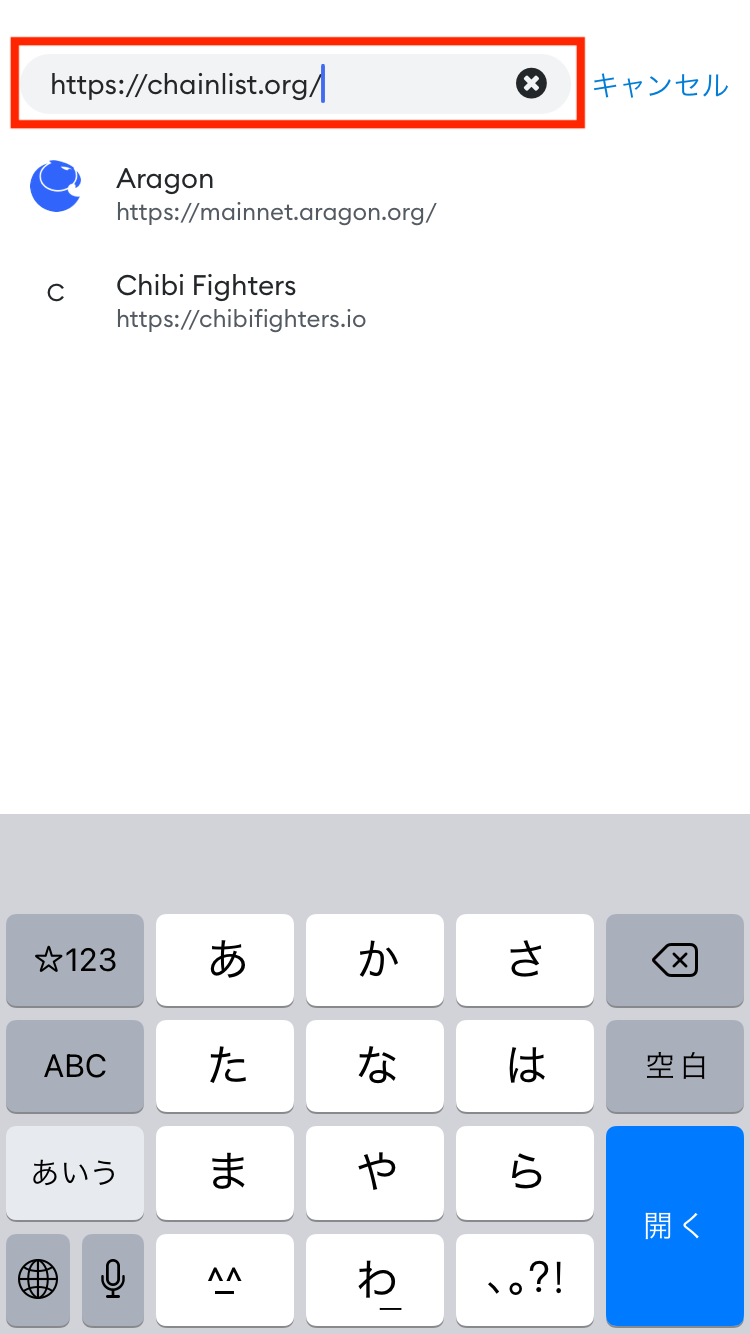
ここで以下のURLをコピーして、検索ボックスに貼り付けましょう。
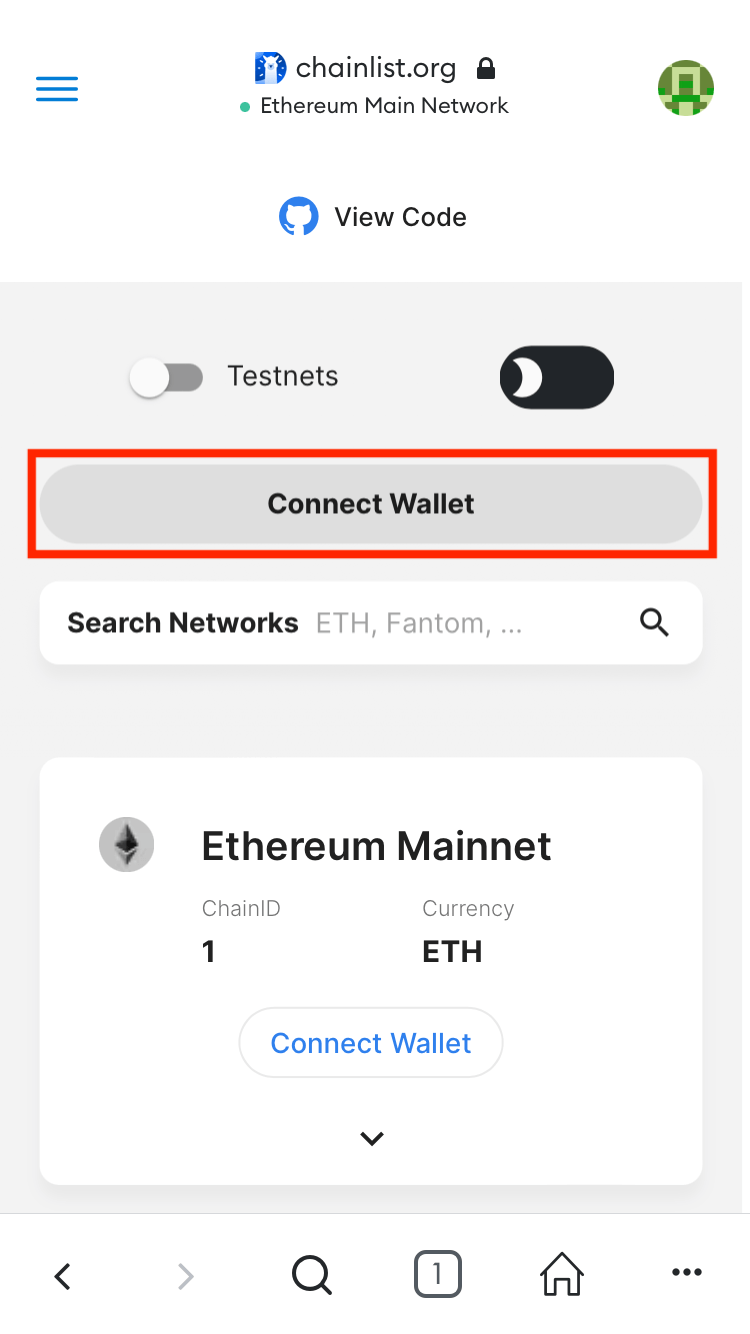
サイトを開いたら下にスクロールして、「Connect Wallet」をタップ。
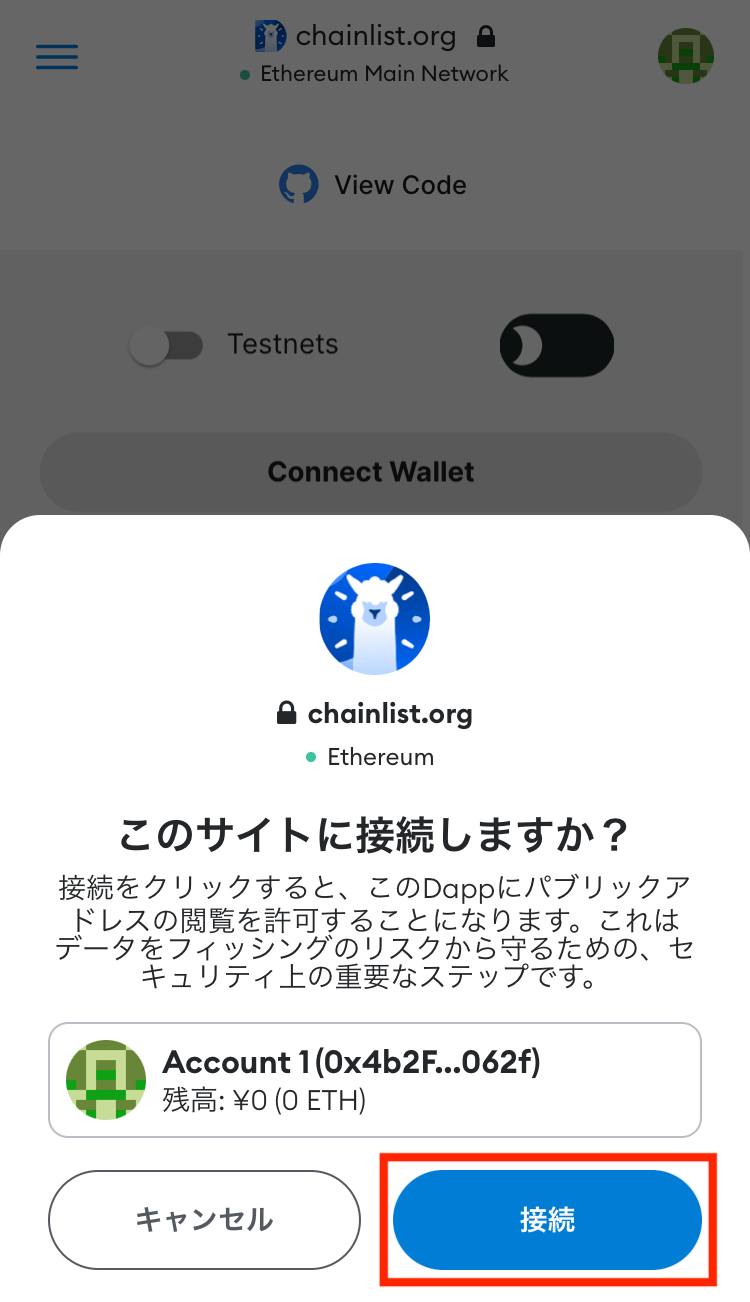
「このサイトに接続しますか?」と聞かれるので、「接続」を選択してください。
無事に接続できると、自分のウォレットアドレスが表示されます!
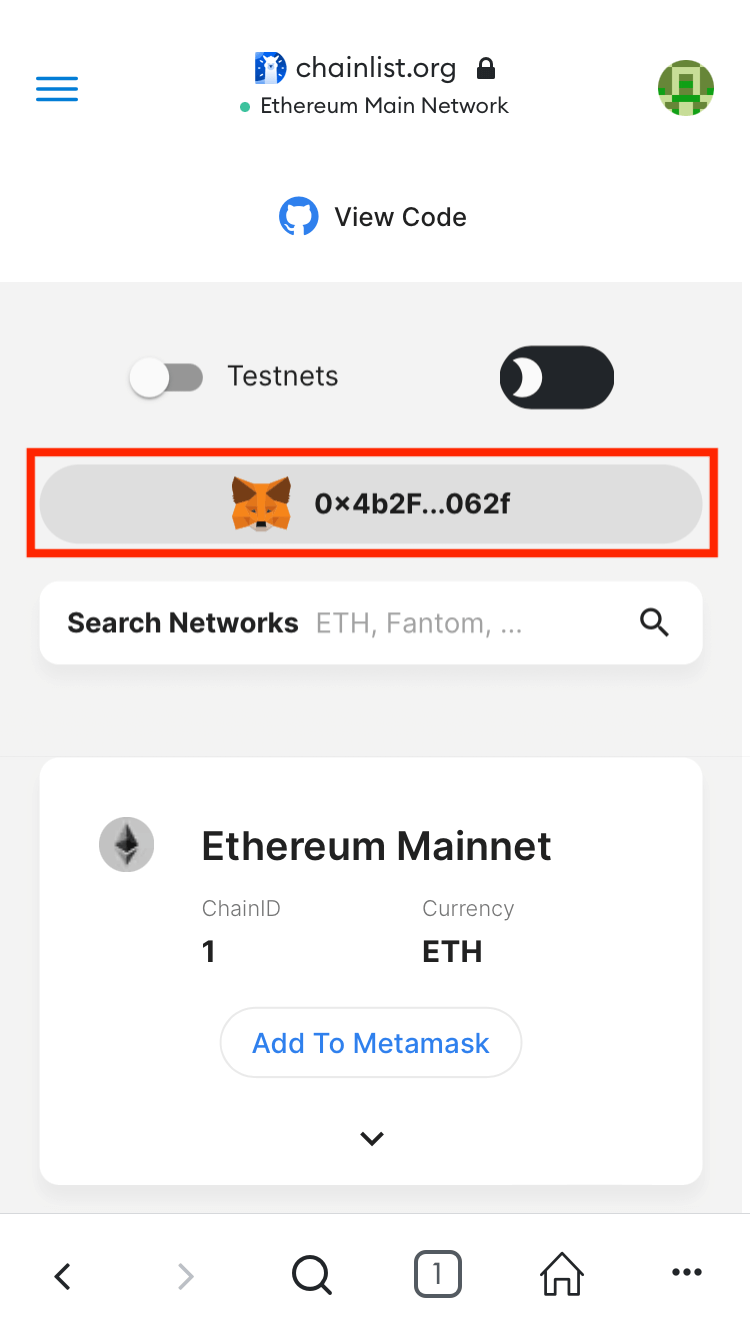
これでChainlist(チェーンリスト)への接続が完了しました!
ネットワーク①:BSC(バイナンススマートチェーン)を追加する
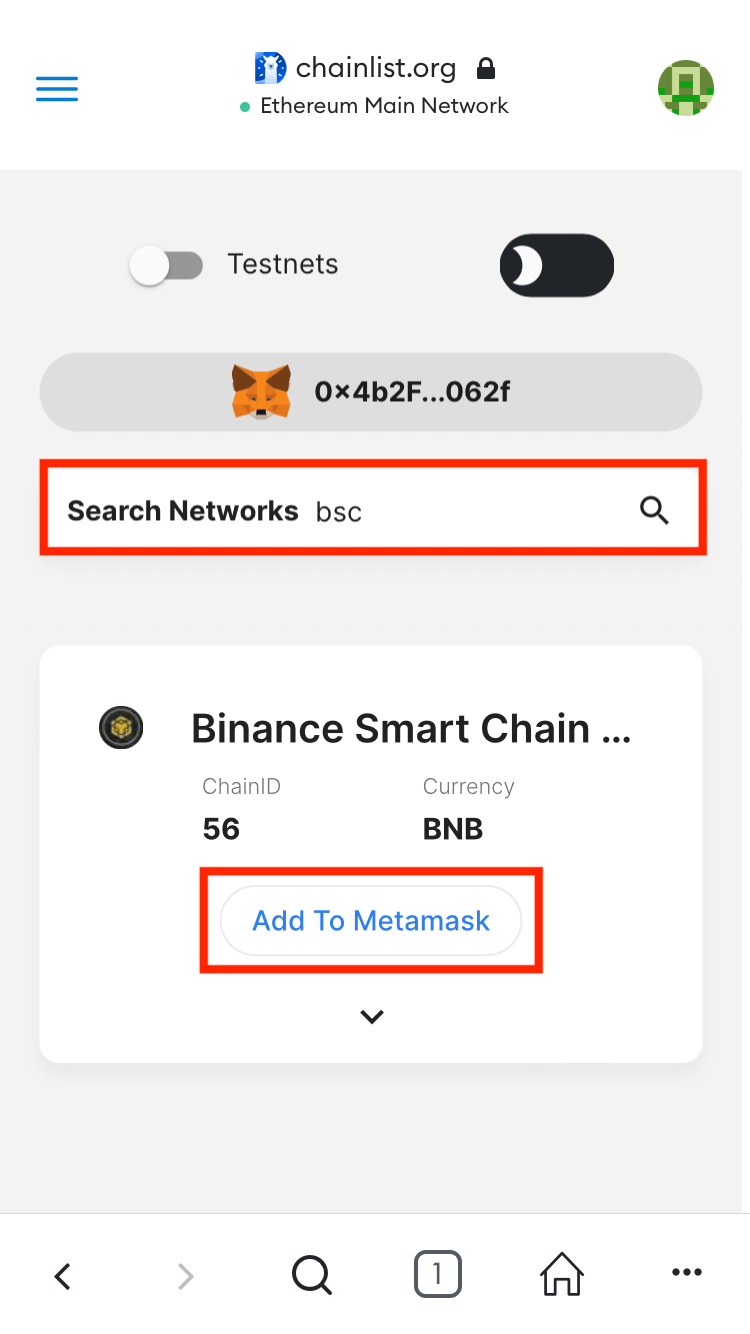
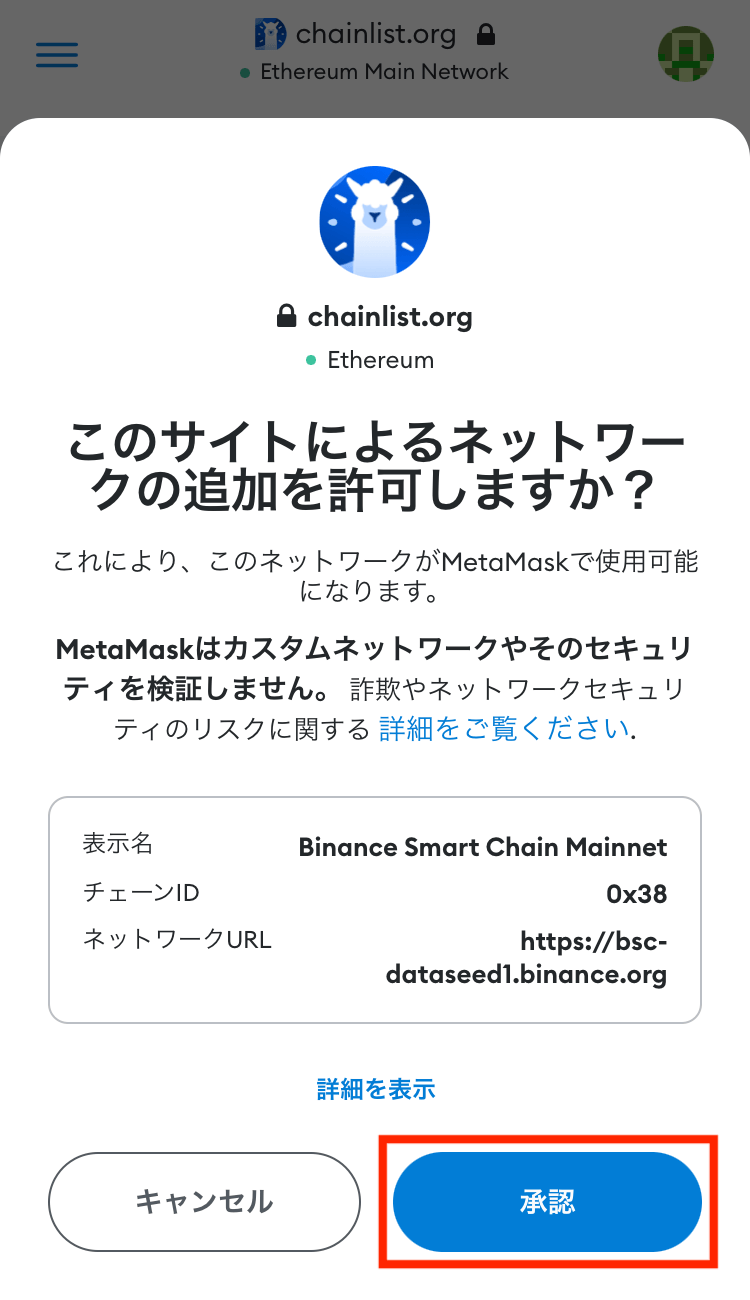
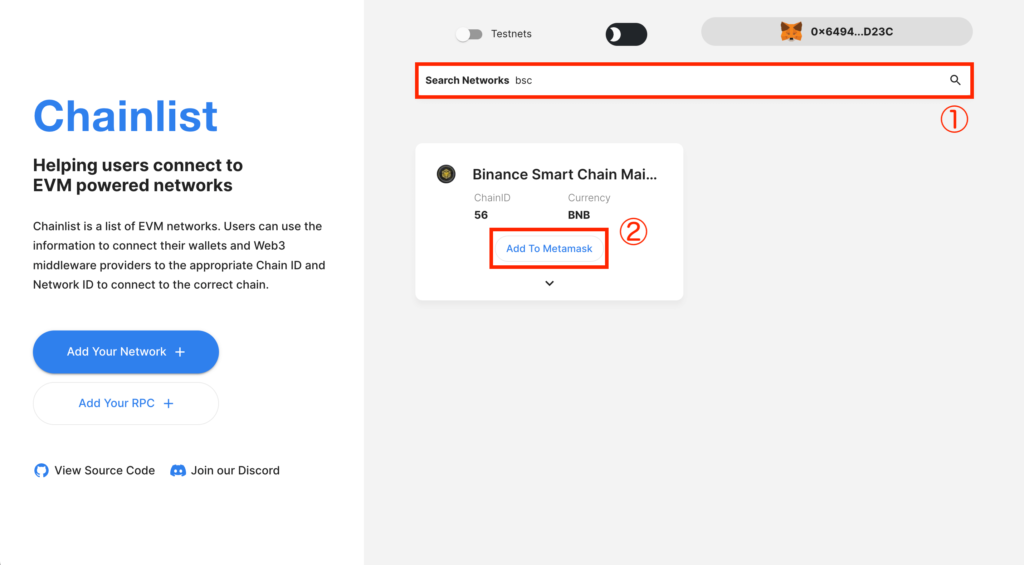
BSC(バイナンススマートチェーン)を追加するには、アドレス下にある検索ボックスで「bsc」と入力。
するとネットワークが表示されるので、「Add To Metamask」をタップします。
ネットワーク追加の許可を求められたら「承認」をタップ。
「ネットワークを切り替える」を選択すると、表示するチェーンをBSC(バイナンススマートチェーン)に変更できます!
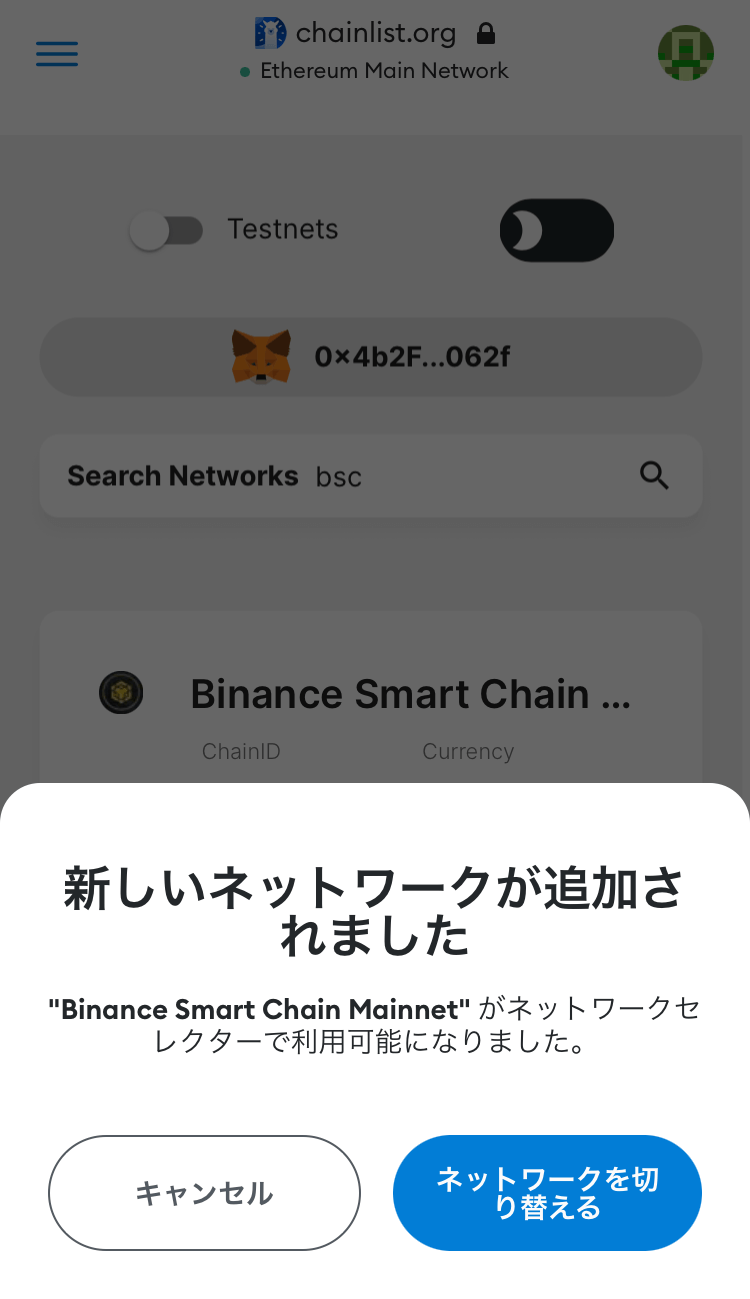
これでBSC(バイナンススマートチェーン)を追加できました!
ネットワーク②:Avalanche(アバランチ)を追加する
次にアバランチ(Avalanche Cチェーン)を追加しましょう!
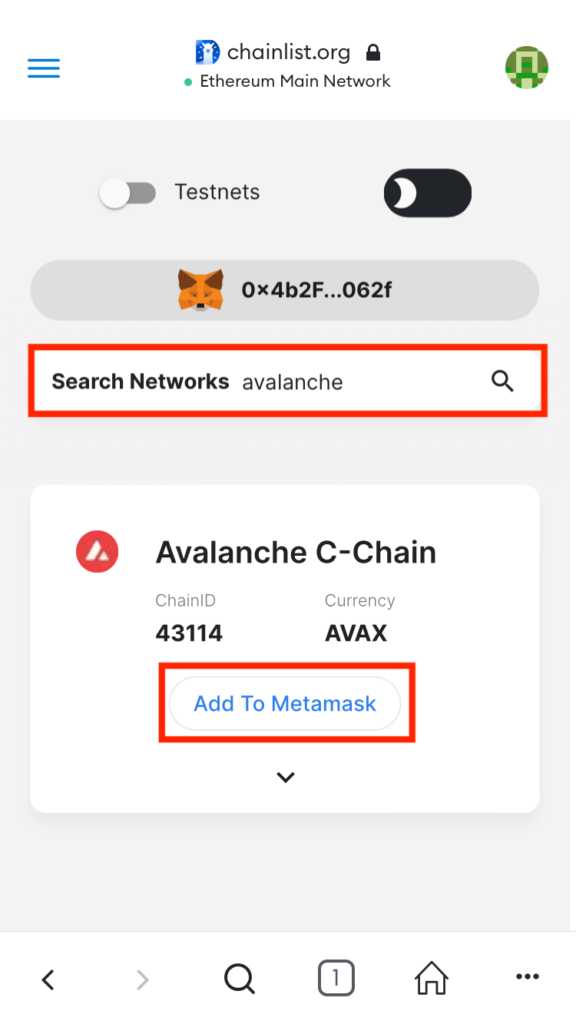
アドレス下にある検索ボックスで「avalanche」と入力たら、表示されたネットワークで「Add To Metamask」をタップします。
ネットワーク追加の許可を求められたら「承認」をタップ。
「ネットワークを切り替える」を選択すると、表示するチェーンをアバランチ(Avalanche Cチェーン)に変更できます!

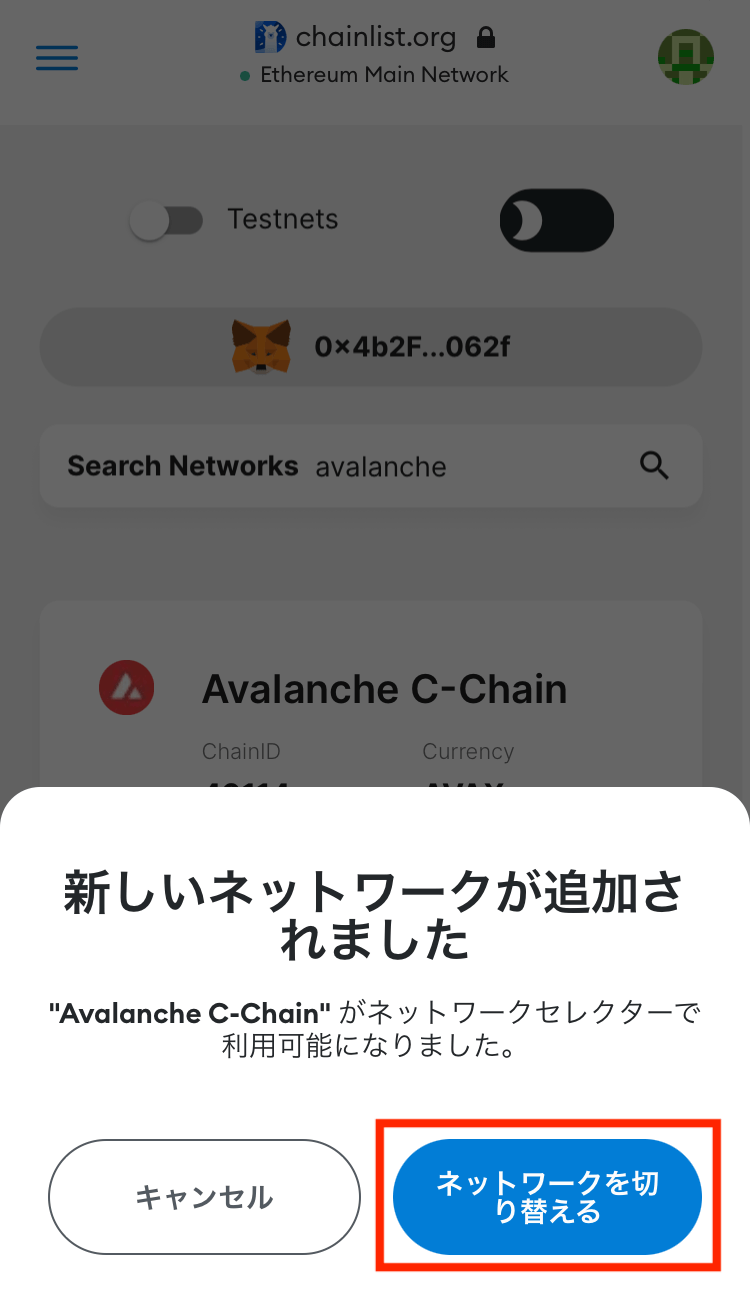
これでアバランチ(Avalanche Cチェーン)を追加できました!
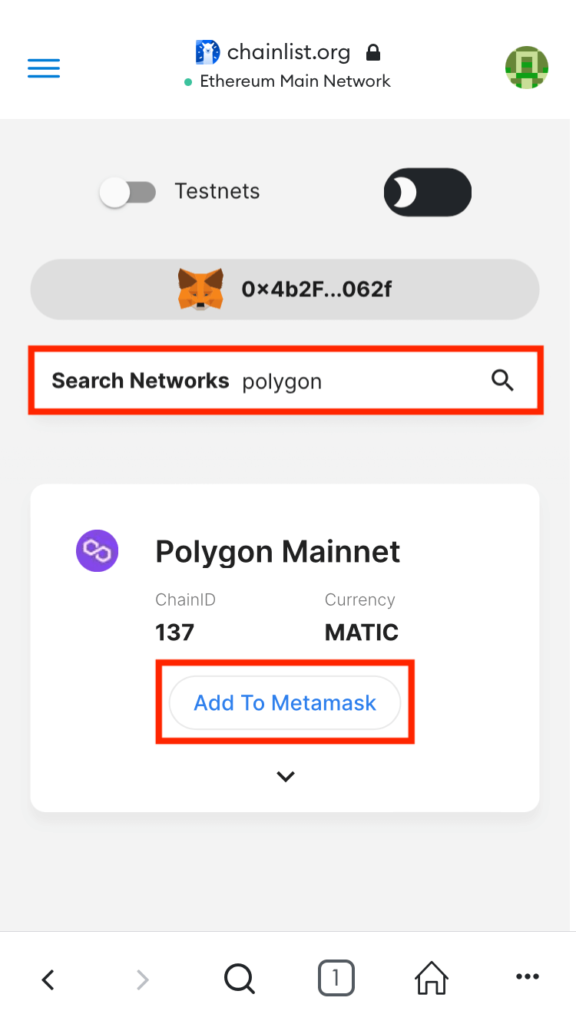
ネットワーク③:Polygon(ポリゴン)を追加する
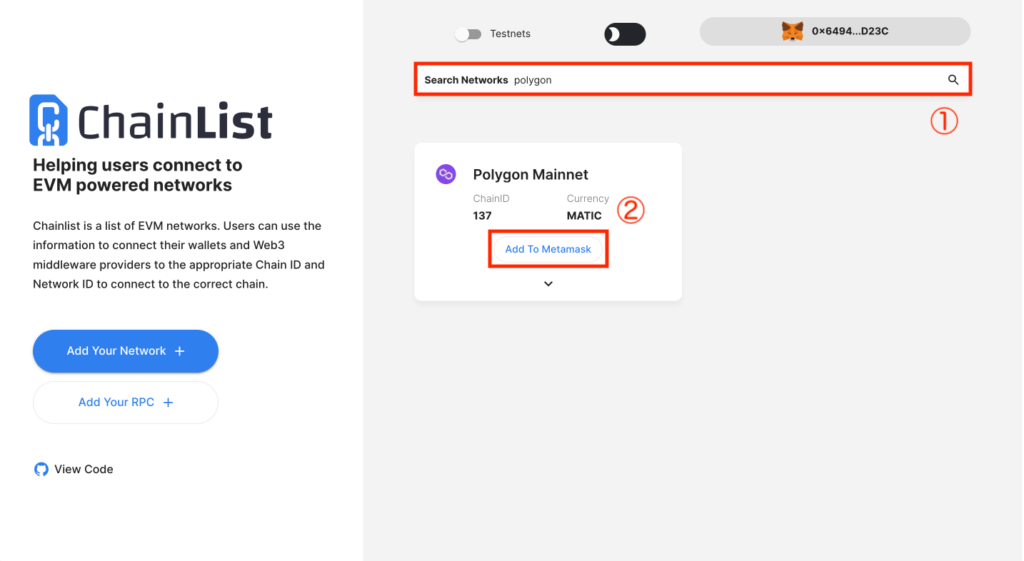
Polygon(ポリゴン)を追加するには、検索ボックスで「polygon」と入力。
するとPolygon Mainnetが表示されるので、「Add To Metamask」をタップします。
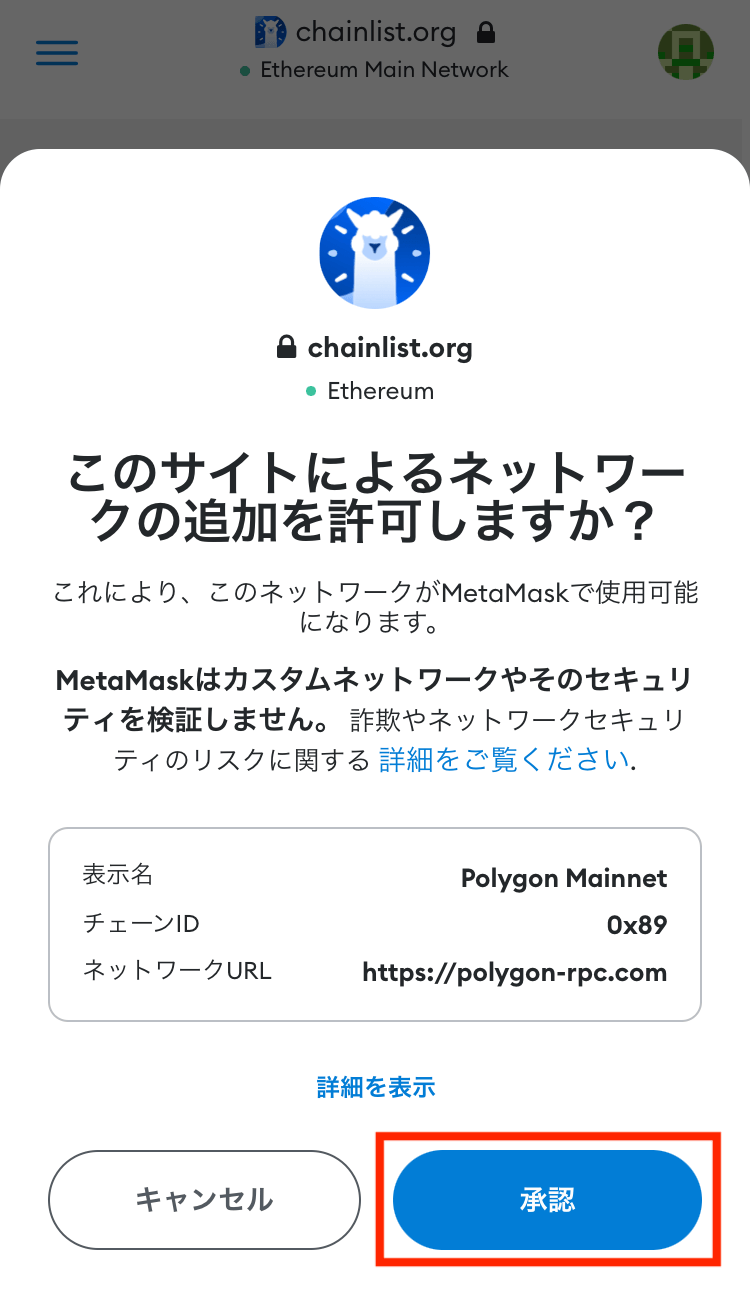
例によってネットワーク追加の許可を求められるので「承認」をタップ。
「ネットワークを切り替える」を選択すると、表示するチェーンをPolygon(ポリゴン)に変更できます!
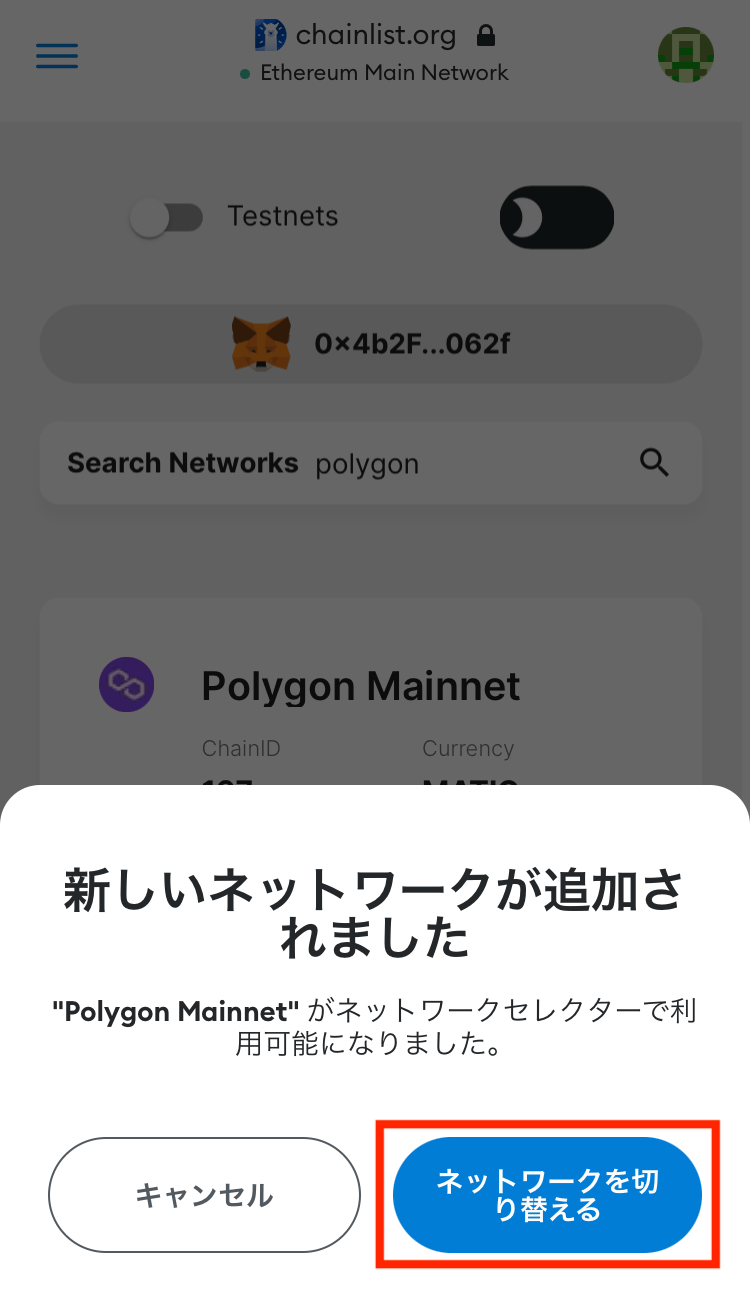
これでPolygon(ポリゴン)を追加できました!
【PC版】MetaMask(メタマスク)にネットワークを追加する方法
次にパソコン版のメタマスクで、以下のネットワークを追加する方法を紹介します。
- BSC(バイナンススマートチェーン)
- Avalanche(アバランチ)
- Polygon(ポリゴン)
上記以外のネットワークを追加したいときは、Chainlist(チェーンリスト)で検索するキーワードを変更してください!
準備:Chainlist(チェーンリスト)に接続する
まずはChainlist(チェーンリスト)でメタマスクを接続します。
Chainlist(チェーンリスト)は簡単にチェーン(ネットワーク)を追加できるサイトです。
以下をクリックして、Chainlist(チェーンリスト)のサイトを開いてください。
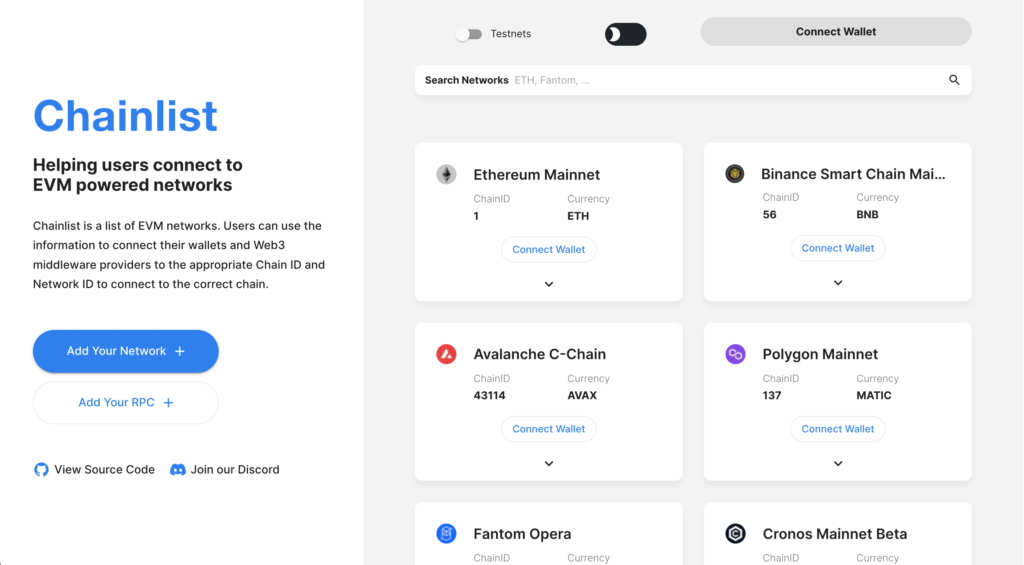
ページにアクセスしたら、まずは「Connect Wallet」をクリックしてウォレットを接続します。
メタマスクのポップアップが表示されたら「署名」してください。
これで下準備は完了です!
ネットワーク①:BSC(バイナンススマートチェーン)を追加する
BSC(バイナンススマートチェーン)を追加するには、「Search Networks」に「bsc」と入力します。
するとBinance Smart Chain Mainnetが表示されるので、「Add To MetaMask」をクリックしてください。
これでBSC(Binance Smart Chain)を追加できました!
ネットワーク②:Avalanche(アバランチ)を追加する
次にアバランチ(Avalanche Cチェーン)を追加しましょう!
「Search Networks」で「avalanche」と入力して、表示されたネットワークで「Add To Metamask」をクリックします。

これでAvalanche(アバランチ Cチェーン)を追加できました!
ちなみに「Cチェーン」と付いているのは、AvalancheではX、P、Cの3つにチェーンが分かれているからです。
NFTゲームやDeFiに触れるには、このCチェーンが必要になります。
ネットワーク③:Polygon(ポリゴン)を追加する
Polygon(ポリゴン)を追加するには、検索ボックスで「polygon」と入力。
するとPolygon Mainnetが表示されるので、「Add To Metamask」をクリックします。
これでPolygon(ポリゴン)を追加できました!
MetaMask(メタマスク)でネットワークを切り替える方法
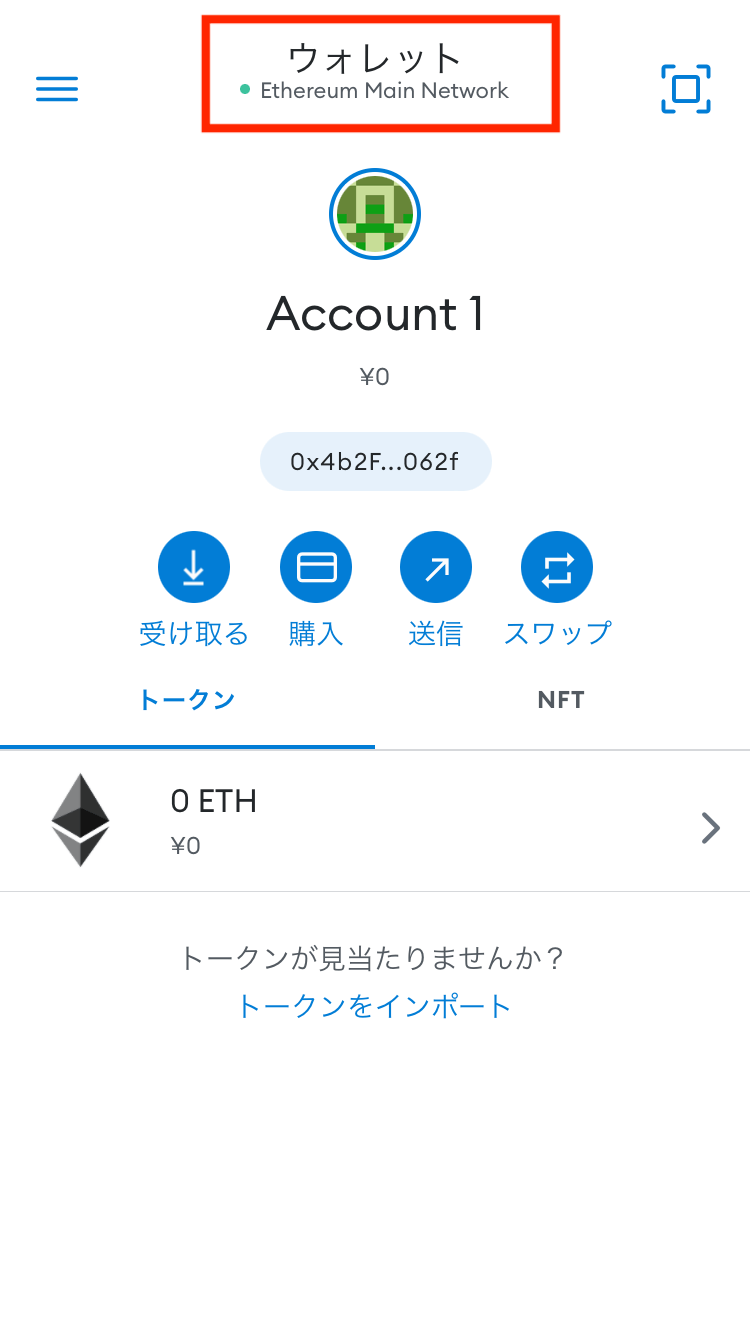
追加したネットワークは、画面上部をタップすれば確認できます。
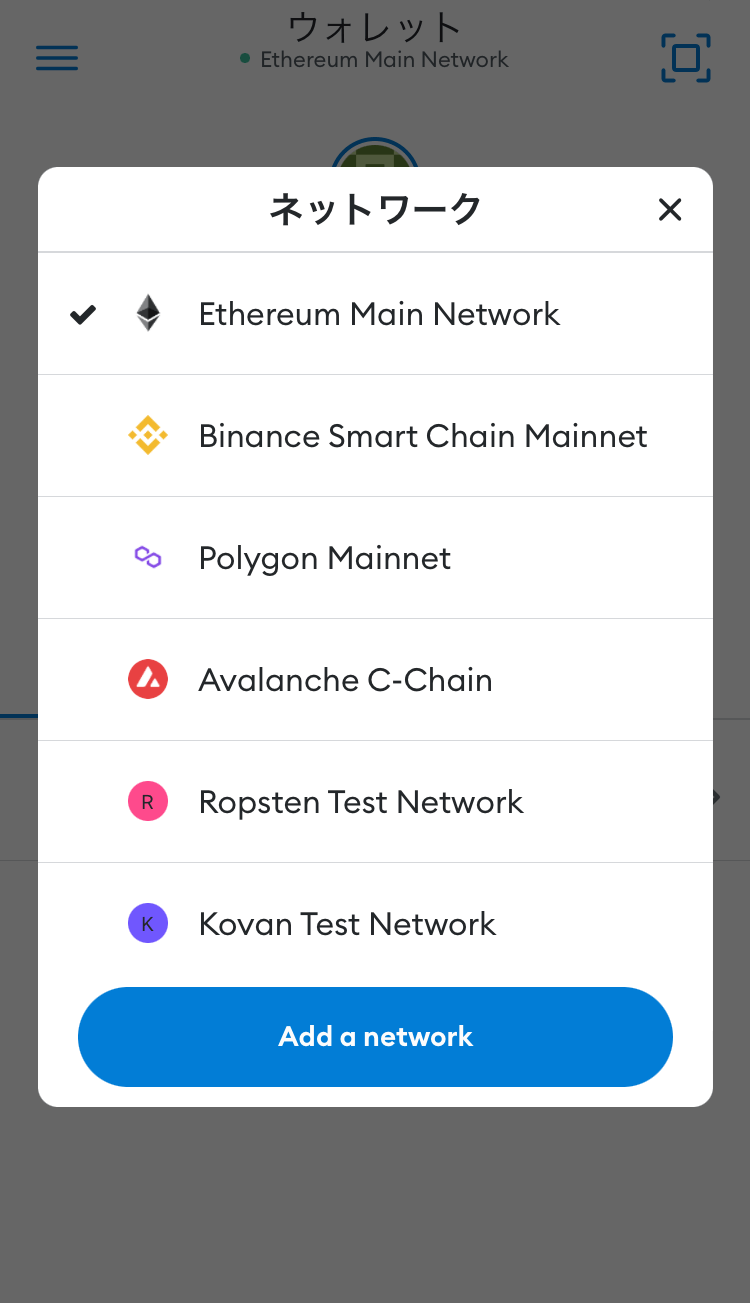
ネットワークを切り替えるには、Binance Smart Chain Mainnetをタップして、留意点が表示されたら「了解」するだけです!
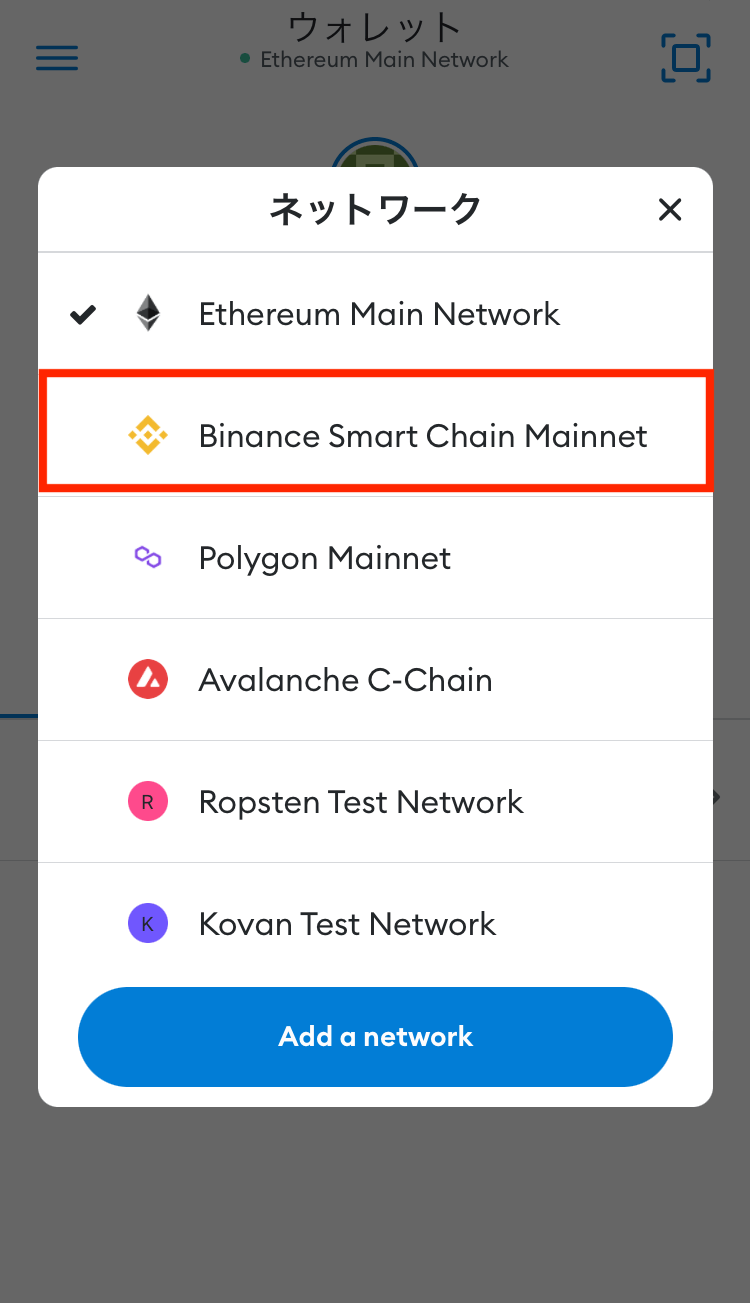
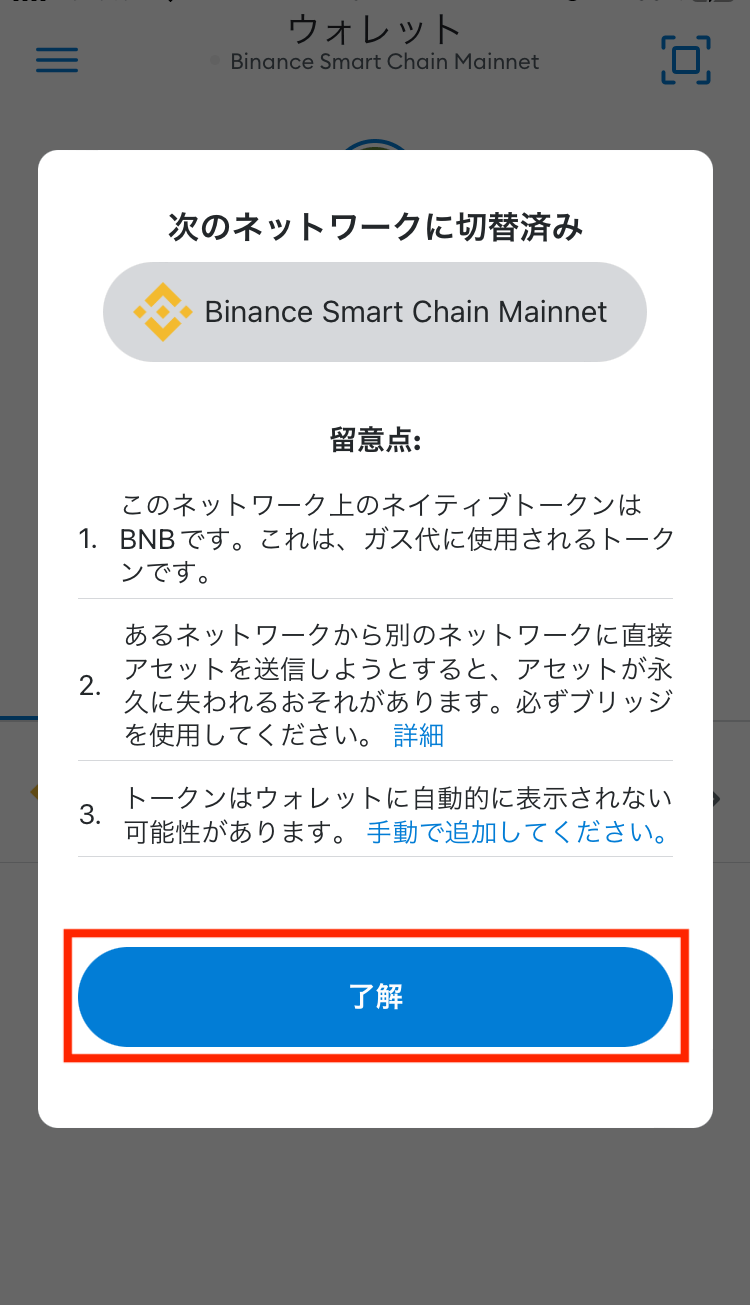
これでBSC(バイナンススマートチェーン)を切り替えられました!
ネットワークを追加したら、仮想通貨を準備しよう
メタマスクにネットワークを追加したら、あわせて仮想通貨を準備しましょう。
なぜなら、ブロックチェーンを使うには、手数料(=ガス代)が発生するからです。
手数料として支払う仮想通貨は、使いたいブロックチェーンごとに違います。
| ブロックチェーン(ネットワーク)名 | 手数料として使う仮想通貨 |
|---|---|
| BSC(バイナンススマートチェーン) | BNB |
| Avalanche(アバランチ) | AVAX |
| Polygon(ポリゴン) | MATIC |
ですが、どの仮想通貨を準備するにしても、手順は以下の4ステップです。
- bitbank(ビットバンク)でリップルを買う(解説記事)
- リップルをBybit(バイビット)に送金する(解説記事)
- Bybit(バイビット)でBNB / AVAX / MATICを入手する(解説記事)
- Bybit(バイビット)からメタマスクにBNB / AVAX / MATICを送金する(解説記事)
Bybit(バイビット)は海外取引所で日本円を使えないため、国内取引所からリップルなどの仮想通貨を送金する必要があります。
どの取引所でも大丈夫ですが、おすすめはbitbank(ビットバンク)です。
コインチェックで送金用のリップルを100万円分買うと、ざっくり40,000円の損になります。
一方でbitbank(ビットバンク)なら、予約注文の取引手数料がキャッシュバックされます。
無駄な手数料を支払って損するくらいなら、そのお金でビットコインを買った方が良いですよね。
3分もあれば口座開設できるので、今のうちに登録しておきましょう!
\ 最短3分&取引手数料が安い /
まとめ:メタマスクを使いこなしてNFTゲームやDeFiを楽しもう!
というわけで、この記事では「メタマスクにネットワークを追加する方法」を紹介しました。
今ではネットワーク(チェーン)の追加は、そこまで難しくありません。
ぜひ今のうちに、メタマスクでイーサリアム以外のネットワークを使える状態にしておきましょう!
また、NFTゲームやDeFiで稼ぐには、必ず以下の手順で仮想通貨を送金する必要があります。
- 国内取引所で仮想通貨(リップルなど)を買う
- 購入した仮想通貨をBybit(バイビット)に送金する
- Bybit(バイビット)で必要な仮想通貨(BNBなど)を入手する
- Bybit(バイビット)からメタマスクに仮想通貨を送金する
海外取引所へ仮想通貨を送金するなら、bitbank(ビットバンク)がおすすめです。
コインチェックで送金用のリップルを100万円分買うと、ざっくり40,000円の損になります。
一方でbitbank(ビットバンク)なら、予約注文の取引手数料がキャッシュバックされます。
無駄な手数料を支払って損するくらいなら、そのお金でビットコインを買った方が良いですよね。
3分もあれば口座開設できるので、今のうちに登録しておきましょう!
\ 最短3分&取引手数料が安い /
※登録方法が分からないときは、ビットバンクで口座開設する方法を参考にしてみてください。
無料でビットコインをもらう
あわせて今のうちにビットコインを0円で貰っちゃいましょう!